MAC filtering is a tool available on most Wi-Fi routers to limit the use of our network to unwanted computers and thus increase the security of our personal, family or business network.

If we want to strengthen the security of our network, whether or not we suspect that someone is connecting without our permission, in addition to the main protection measure that would be changing the access password for a different and more complicated one, we can set another type of limitation through this tool from our router.
What is MAC filtering?
Each device capable of connecting to a Wi-Fi network is assigned a different number that identifies it from the rest of the devices. It’s like your ID and it’s known as MAC (Media Access Control). It is actually an identifier composed of numbers and letters, with six blocks of two characters each, with an appearance like the following: A1:F4:33:2B:70:CD
When a computer connects to our router via Wi-Fi, that number is shared and is visible in the configuration of that router. From there we can see it normally by accessing the list of connected devices.
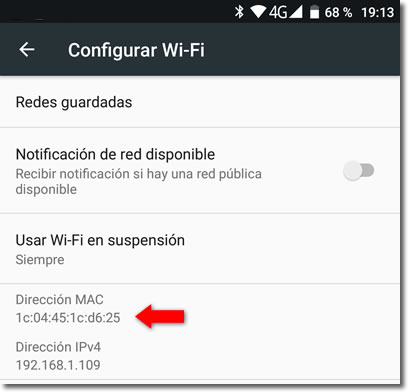
We can also find out the MAC address of a device by looking at the configuration options it has in its Wi-Fi section, such as on a mobile phone.

Whitelist or blacklist
In our router we can set a filter so that only the devices with the MAC that we allow will connect, which we would understand as a white list. That way no other unknown device with a different MAC could connect even knowing the access password.
The MAC filter can also be used as a blacklist, that is, to allow all addresses except those included in the list. Useful to prevent, for example, that of a certain neighbor from connecting, because we have discovered that he usually does without our permission.
How do we activate MAC filtering?
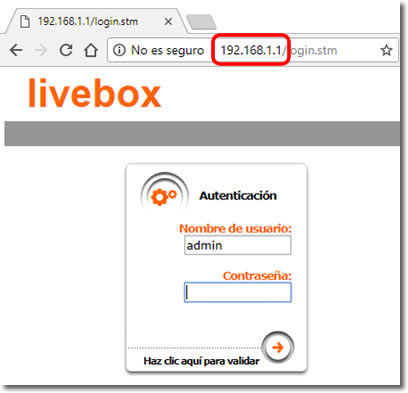
To activate the MAC filtering in our router, we must access its settings. We will do so by typing 192.168.1.1 in the address bar of our browser. In this case, we will see an example of how to access and configure the Livebox router, where the user and password are “admin”. Previously, the computer must be connected to the router network we want to configure.

Other routers may require different numbers than those mentioned above, and they will be listed in their documentation. Also the user and the access password may be different from ‘admin’. In order to configure those of Movistar, we must connect to its “Alejandra portal”.
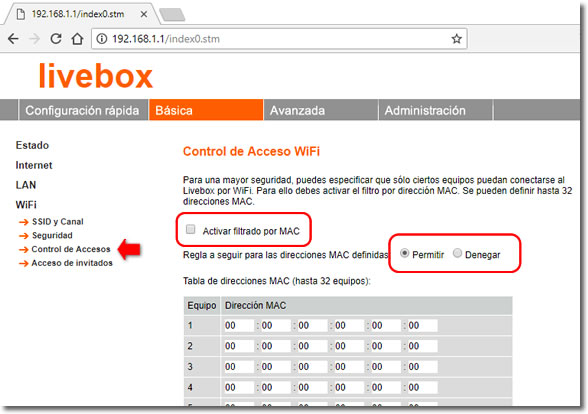
In our case, we must go to ‘Basic > Wi-Fi > Access Control’ and there activate MAC filtering.

On other routers the location of this tool will be different, but you only have to look through its configuration menus a little bit to find it.
We see that we can choose between Allow some MAC addresses that we will write under (whitelist), so that only the computers we designate can be connected.
Or choose Deny (blacklist) to prevent that only the addresses that we type can be connected to our Wi-Fi network.
We see in the router of the example that it only supports a maximum of 32 MAC addresses, which in many homes could fall short of the white list mode due to the large number of devices that can currently connect to the network.
Other routers will have a different limit, which in case of interest, we will have to find out before purchasing it.

technology is getting so advanced that every day some new and different technology is invented or enhanced the old things by adding some new function which is done here.