With this post we respond to our young reader Aitor who has made the following query.
 It is possible to connect more than one screen to the same computer, laptop or desktop, so that we can have different views on each one. The result will be a single computer running, but showing different applications on each screen.
Let’s see what we can do to connect an additional screen to a computer running Windows 7, although it would not be very different for any other version of Windows.
The first thing we need, logically, is a screen available, which today can be any of the flat screens or televisions on the market. Virtually all have special entries to connect to computers.
There are mainly two ways to connect the screen to the computer.
- By HDMI, using a cable like the one shown below. This method transfers both image and sound to our second screen, which can be interesting for watching movies on the big screen for example.

We also find the possibility to connect current phones and tablets to other screens via HDMI, usually using a HDMI micro cable to HDMI, but this must be checked for each model to see if it is viable.
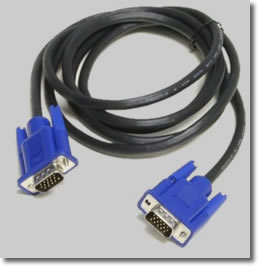
- By VGA cable, like the ones in the next image. This medium only transmits the image and tends to disappear when the use of the previous one is extended.

After connecting the new screen to our computer using one of these cables, it is possible that on some models the image will appear immediately, but in many cases the corresponding entry will have to be selected to show it to us. The current TVs have several inputs available and with the help of the remote control it is possible to choose which one to watch.
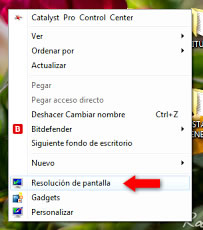
To configure our new screen on the computer and choose what type of desktop we want in it, we must right click on the Windows desktop and enter ‘Screen Resolution‘.

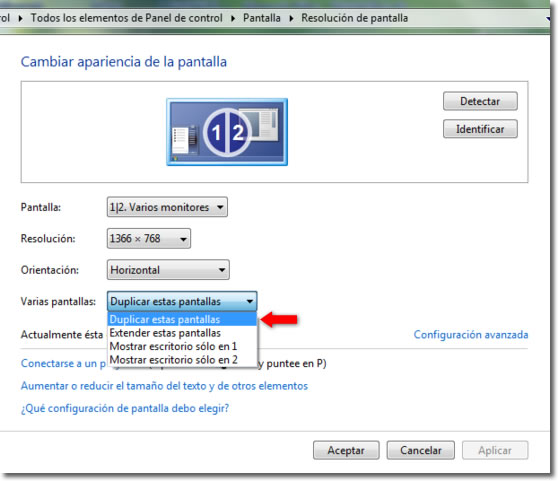
We open a dialogue with different options. By default we will see the two duplicate screens, that is, it will show the same in both. This configuration is also known as “cloned screens“.

It is often used, for example, to make presentations. The author uses the small screen of his computer to carry out his actions, but the public sees them in a bigger screen.
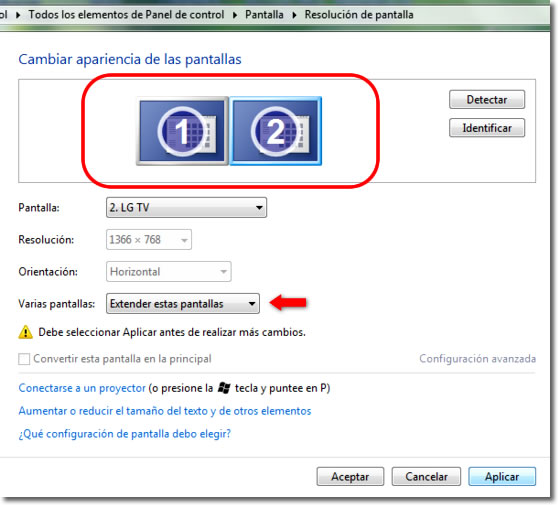
But we can change this initial behavior. We can use the second screen to extend our desktop. We get to add a much larger space to our desktop, usually to the right, which we do not see from the original screen, but which is available on the second screen. We must choose the option ‘Extend these screens’.

It allows us to have different windows open in each place so we can work with different applications at the same time, as long as we have both screens in sight, of course.
If we take a screenshot when we have the desktop extended, the image contains both desks, which helps us to understand its operation. In the next example we see two screens and three windows, the window on the left appears on screen 1, the one on the right on 2, but the middle one is purposely shown on the left, a part on each desktop, to show the idea of the continuity of both desks.

To help us organize our workspace, we can press the ‘Identify’ button, which will make it superimpose the screen number that each desktop has designated to it. We can change that number by moving the icons that simulate the screens in the previous dialog box.
